Wednesday, December 15, 2010

Shop, make, bake...

The holidays crept up SUPER FAST this year. I can't believe there are only 10 days left until Christmas. People are almost starting to panic that their holiday shopping is not done. I am CLOSE to being done. There are just so many people to remember....Teachers, Aunts & Uncles, 2nd Cousins twice removed, your sister-in-law's boyfriend (is he even COMING to Christmas). It's overwhelming when you make a list of everyone to buy for.

If you are around the Peoria area and shopping for your mom, girlfriend, sister, friend, or other lady in your life, you have to go into my favorite shop, Relics. It is one of Peoria's best kept secrets, on Adams across from Hardees, next to Cracked Pepper. I tell everyone to go there if they like adorable housewares, vintage conversation pieces, affordable jewelry, books, and funky stuff. Crossing my fingers that my husband will go there and pick out Christmas gifts for me. Absolutely anything will do, but I love the jewelry...hint hint honey.

Homemade presents are cheaper (most of the time) and go over pretty well. I am crocheting my fingers to the bone to try and get gifts done. This site, The Crafty Crow, has great ideas for handmade ornaments and other gifts. I love the ideas for gifts that kids can make. Next week the kids are off school, and we always make some handmade ornaments to handout to relatives. I think we are going to make the bell flower ornament.  Although I really love the little owl ornament from that artist woman blog. So I might have just showed some of you your presents...whoops.

 Last year I made treat bags with Chocolate Chip Biscotti, a few fancy Tea Bags, and some candy, to pass out to extended family, friends, teachers, and people I worked with.
Here is the yummy Biscotti recipe I used. It was super easy, if you are good at burning chocolate chip cookies then you can make these! They are also vegetarian!
  • 2 cups all purpose or whole wheat flour
  • 2/3 cup sugar
  • 1 tsp baking soda
  • 1/2 tsp salt
  • 1/2 cup mini chocolate chips, semisweet or milk chocolate
  • 3 eggs, beaten
  • 1 tsp vanilla
  • 4 squares of semisweet bakers chocolate
Preheat oven to 350. Mix together dry ingredients and chocolate chips. Add eggs and vanilla. Knead dough on a floured surface a dozen times or so. Form the dough into a long log 2 inches wide and 15-16 inches thick. Place long on baking sheet coated with nonstick spray. Bake for 30 minutes, remove from oven and let cool. Cut diagonally with a serrated knife, into 1/2" slices.  Change heat to 325 a d bake for 10 more minutes, then flip the slices over and cook for 10 more minutes or until golden and crunchy. The centers may look a little soft, but will harden as they cool.
Melt the chocolate in the microwave, following directions on the package. Allow chocolate to cool but not harden before dipping one side of the biscotti into it. Place cookies on wire racks, chocolate side up, until cool. Place in airtight container to store. Dip in your tea or coffee and enjoy!

Good luck with finishing your holiday shopping, making and baking! 

Monday, November 15, 2010

Costume Bonanza


 Halloween is my favorite time of the year. It is over and I am a little depressed, but I can look back at all the awesome photos I took and feel a little bit better. Pretty much the only time I use my sewing machine is to make Halloween costumes. This year Charlie wanted to be a mummy and Jack wanted to be a ninja. I was hyped up to make both. I know I could have bought them both, but I love the challenge of creating something from nothing. The ninja costume I sewed out of a shiny black material, added a patterned black band for a belt, and a red sash. A black set of long under-ware went under his costume. I found a simple way to make a ninja mask out of a black t-shirt. My husband helped Jack make throwing stars which we attached with hot glue. The ninja swords he broke after the first time wearing his costume...they were cheap plastic. His crotch ripped out of his pants the first time he jumped into a ninja crouch, but I was ok with that, since I have no formal training in sewing, and my sewing machine decided to stop working. I hot glued them back together.


For the Mummy I took tips from a cool website. I tore the gauze material into strips, dyed them with tea, dried them in the dryer (BAD idea. Next time lay them out to dry), and hand stiched most of them to his white long under-ware. I learned that you can NOT actually wrap the strips around the long under-ware or it will not come back off your child. So instead I draped and pinned each one and stitched it into place. Charlie was pretty patient for a 5 year old boy! He had to try the costume on about 4 times. We ended up hot gluing on the final strips and the spider on. The headpiece was pretty fun to make. My grandma recommended making a paper mache base. I measured Charlie's head, blew up a balloon to that same size, then used loads of modge podge to glue on cheesecloth. Once it dried I popped the balloon and sewed the gauze strips onto it. It turned out comfortable and awesome. Charlie got a lot of compliments at school on his awesome mummy costume, as did I!


 The kids had a blast at school, at the Water Street Spooky Fiesta, where they saw the Oscar Meyer Weiner Mobile and ran around like spooks! Then of course there was trick or treating. There are a few houses that go ALL OUT for Halloween, decorating their entire yards and front porches. I want to be one of those people someday.

I also saw lots of great adult costumes at my work,all Halloween weekend. Below are some of the best costumes I have seen. Many are my friends. Great costumes guys! My husband and I are in there as hobo clowns. I found most of the pieces for our costumes at Goodwill. I also attached lots of patches and altered my dress to be puffier. I was pretty proud of our makeup too, especially my husband's. He won the costume contest at Rhythm Kitchen Music Cafe for his awesome costume!


Until next year, HAPPY HAUNTING!

Thursday, October 28, 2010

Pumpkins and Gourds


These photos are from our favorite local market, Schaer's country market. It is a family owned and run business and it is a tradition of ours to go there for pumpkins in the fall and a Christmas tree in the winter.  We love it because it's in walking distance of our house, although we drove this time. It would be a little difficult to walk and haul a bunch of pumpkins. Just wanted to share these lovely fall photos from one of our favorite places.


Tuesday, October 12, 2010

First chili cookoff - some tasty stuff


Earlier this fall, we had a chili cook-off to celebrate the end of summer, beginning of fall, and my husband's 31st birthday. A few people brought chili, a few brought soup, and a few brought some other delicious creations. We had some really good entries! we had everything set up with signs and people painstakingly voted on their favorites. First place was taken by Kelly with her Polish Mistakes, neither chili or soup, but totally scrumptious. Below are some of the winning recipes.
 Polish Mistakes by Kelly S
(seen on the photo to the right at the bottom left side)
I used 1lb turkey sausage (you can use regular sausage and ground beef)
1lb ground chicken meat
1 medium onion chopped
oregano
garilic salt
velvetta cheese
rye cocktail bread (small squares)

Preheat oven 350
Brown the meat with a little olive oil and  add onions
Add oregano and garilic salt to taste (don't have exact measurments)
add the velvetta cheese until melted(i used about 1/2-3/4 of a block of velvetta chesse cut into cubes)
Stir together until well blended
Add a spoonful of mixture to each cocktail square and place on cookie sheet
Bake for about 10 to 15 minutes until toasted and enjoy!

Chipotle Chili by Joe H.
1 LB Ground Meat
1 Red Onion, Diced
4 Garlic Cloves, minced
1 Can Diced Tomatoes with Jalapeños, Drained
1 Lrg Can Tomato Sauce (~30oz)
1 Can Light Red Kidney Beans, Drained, Rinsed
1 Can Dark Red Kidney Beans, Drained, Rinsed
1 Chipotle Chili Pepper, Minced (or Chipotle Chili Pepper Powder)
1 Bay Leaf
Chili Powder, Salt & Pepper
 
Brown the meat and season lightly with chili powder, move meat to crock pot and leave about 3 tablespoons of fat in pan. Sauté onions and garlic in fat until soft, add to crock pot. In crock pot, add tomato sauce, diced tomatoes, beans, and chili pepper (or 2 teaspoons of chipotle chili powder, to taste). Add bay leaf, 4 tablespoons of chili powder, and salt and pepper to taste. Cook on low at least 5 hours. Add more spices to taste.
 
Chilli Mac-Attack  by Me! (first photo at the top)
1 onion chopped
1 green pepper seeded, veins removed, and chopped
1 pound of ground beef or turkey
1 packet of chili spices
1 tsp chopped garlic
1 large can of tomato juice
1 can of chopped tomatoes in their juices
1 can of black beans (drained)
1 can of red kidney beans (drained)
1 can of chili beans in seasoning
1 Tbsp cumin
salt and pepper to taste & macaroni and cheese, prepared as package says. 
Brown meat in a large pot, drain off grease. Add onions, garlic and green peppers. Cook for 4 minutes or until they have softened a bit. Then add spices, tomato juice, and tomatoes. Bring to a boil then turn heat back down and cover and let simmer for 20 minutes. Add the beans and let them heat up for 5 minutes or so before serving.  Scoop some mac and cheese into the bowl, then top with chili and add some crackers or cornbread to the side. This kid-friendly chili-mac attack, is the only way I can get my kids to eat chili, and also by crushing up the beans so they are hidden in with the meat. Its good with shredded cheddar cheese or sour cream. 
Thanks for submitting recipes friends!

Thursday, September 23, 2010

Summer is over TOO SOON!


This summer went by entirely TOO FAST! I still am not into the swing of things: the kids' school, volunteering @ school, weekend work, puppy time, volunteering after school, soccer practice, parent club meetings, attempting to exercise and eat right, cub scouts, and attempting to keep the house semi clean. Not that I am complaining, I love my life, it's just a bit insane right now and I need to get my schedule worked out a little better.


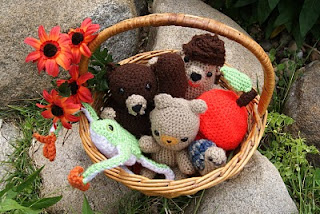
This summer we kept the kids pretty busy, which is essential in keeping myself sane. I didn't have a lot of time to do arts or crafts, but there are a few things I made that I am pretty proud of. I made a whole slew of crochet critters for a Benefit for my friend's son earlier in the spring. They turned out quite cute, went up for auction or raffle for a great cause, and contributed to the final total of over $30,000!


My favorite is probably the robot or the beaver....maybe next time I could combine the 2?

Most of these patterns I got from 2 books by my favorite author and Amigurumi crochet guru, Ana Paula Rimoli. Her books are wonderful, that is where I learned how to do Ami, and her blog is adorable and funny http://amigurumipatterns.blogspot.com/


I have been attempting to design a few of my own Ami designs lately, I hope to put them up on my blog or Ravelry eventually.

One of my friends from high school recently started a wonderful do it yourself craft blog, howd.i.y. blog. It is a great blog, with tons of cool do it yourself projects, gift ideas, and crafts. Check it out. (:

Friday, April 9, 2010

ABC, as easy as 123.

ABCs are so important for kids to learn and understand. Of course they learn at school, but at home is where you can really help them get the concepts that eventually lead to reading.


Letters have been a main focus for our 4 year old for the past year or so. He is going into kindergarten next year, as a freshly turned 5 year old, one of the young ones. 2 years of preschool have taught him a lot about how to act in a classroom setting, sharing, picking up, and of course the pledge of allegiance. He loves his friends and his teachers, who are the sweetest ladies in the world.

I had been getting a little nervous as he nears kindergarten, and has shown ZERO interest in letters, numbers, writing, or drawing. Our oldest always loved to draw, and write, where Charlie would rather set up all of his action figures into a neighborhood and then play with them,. He is a really imaginative player. He also loves to make up stories and tall tales. They are just so different, which means they become interested in things in different ways. The things that grabbed Jack's interests may not grab Charlie's. So we had to get a little creative when it came to letters and writing.


We have been reading Baby Einstein's, ABCs of Art, about 4X a week for over a year now. We did this with Jack,when he was in preschool, and he picked them up pretty quick. We read each letter and look at the picture on the page to represent it. In the last 6 months,Charlie has been remembering some of the letters, but then he would forget them and remember others. We reached a milestone last week when he read EVERY LETTER in the book. But reading that book was definitely not the only tool we used. There are so many helpful resources out there, fun and imaginative things that make learning fun.


Some friends gave us, They might be Giants, Here come the ABC's, video/cd, for one of the kids' birthdays. There are songs about different letters that are catchy, fun, and hilarious. Alphabet lost and found makes you want to dance. This was really helpful because i could remind Charlie, BIG FAT......(and he would think of that song)....W! It was probably this video that sparked his recent interest in letters and writing.

I have been sitting down a few times a week and practicing writing letters of the alphabet with charlie. This was frustrating at first, but I tried to make it fun. He could draw something that started with the letter A after writing it. This encouraged him to think creatively about letters and connect a letter with a picture. We only did a few letters at a time and then tried to repeat them the next day.


Back in December I dug out my alphabet cookie cutters, surprisingly they were all there. Charlie had a playdate with his friend Hunter and we made the entire alphabet in cookies! They got to roll out the dough, pick out the letters in alphabetical order and cut them out. We never got to decorating them with frosting, but they tasted good anyway!


Now Charlie can spell and write his own name. He sees letters he recognizes everywhere, and we often play the which letter is this game (Charlie writes a letter in the air and asks me which one it is).

Jack on the other hand is reading chapter books! Reading is the next hurdle after learning letters and it is another slow going process. Repetition and patience are the things to remember when helping your child read. Every night before bed we read to the boys, then it switched to us helping Jack read an easy reader, then he read it himself with a little guidance and now he is a fairly confident reader. I remember being encouraged to SOUND it OUT, but at Jack's school they recommend not doing that. They want the kids to recognize the words and look at the pictures in the books and figure it out that way. I have to admit, I have been known to help him sound the words out, but I try to stick to the same thing they teach at school in order to be consistent. It is crazy to look back to Jack's reading level a year ago and compare it to today, he has improved so much!


Flat Stanley was the first chapter book he read. There are some big words in it, but with our help he got through it. Now he is on his fourth Flat Stanley book! We always discuss what happens in each chapter because I want him to really understand what he is reading and not just zip through the words.


It has been a long road learning ABCs and now reading, but it has been fun and interesting. Each child learns differently and it is important to find what interests them and to go in that direction.

Monday, February 22, 2010

Fun and Yum

Just a quick little blog note. I somehow stumbled upon this REALLY COOL site called Humanclock.com. Super cool photography, put into a clock that changes every minute. Click on "view the clock" to watch the minutes flash by in photos. You can submit your own photos too!

Once you get done there, feel free to whip up some delicious rice pudding. My mom used to make this all of the time when we were kids, for a cheap and easy dessert. Warm up those cold bellies after an afternoon of snowball fights.

Rice pudding (for 4 or 5 chilly people.)
1 cup(or more) cooked white or brown rice (short/medium grain) Leftover from dinner?
1& 1/2 cups skim milk
1/3 cup sugar (you can use splenda too but I don't know the amount)
1/4 tsp salt
2/3 cup raisins or golden raisins (or I like craisins)
1 large egg beaten
1/2 cup milk
1/2 tsp vanilla
1/2-1 Tbsp butter or margarine
Sprinkle of brown sugar or cinnamon.

In a medium saucepan, combine rice, milk, salt, and sugar over medium heat. Cook for 15-20 minutes, stirring periodically, until it's thicker and creamy. Combine the egg & 1/2 cup of milk then add to the pan along with raisins. Stir constantly for 2 minutes. Remove from heat, add vanilla, butter, and raisins. Stir it up. Sprinkle with cinnamon and enjoy warm. (:

Friday, February 19, 2010

Hopper Picture Person Project


Ground Swell, by Edward Hopper was the latest work of art I discussed with my 1st grader's class. The kids liked it because of the boat and the ocean, and in the middle of a harsh Illinois winter it seems almost like paradise. Hopper is a famous American realist painter, most known for his painting, Nighthawks.


Anyway, Hopper is known for painting everyday realistic themes that evoke feelings of loneliness and sadness. His use of color is an important factor in his work and for the kids' project we used color to create an emotion. We talked about Hopper's life and how his work was different than most artists at the time. He painted things to look realistic in a time when abstract art was all the rage. He loved to paint boats and the ocean and other everyday scenes.

I found the project in this AWESOME book. It is a great project that even Charlie (who is 4) loved. The finished project is totally frame worthy.

First off I mounted drawing paper (not sketch) on a board. My makeshift "boards" were made
from free USPS shipping boxes cut in half. I used thick blue artist tape to tape the edges of the paper to the board, covering about an even strip around the edge to create a border when removed. I brought a ton of black permanent markers and told the kids to draw something emotional, something that would create a feeling. I had them name some feelings and then we asked them to tell us what they could draw.
We practiced it at home, like we always do, to test the time and mess factors that will be involved in the project.

Jack drew a dog and Charlie a happy face. Once they drew their main subject, we put the permanent markers away. I then had the kids color with some washable markers, letting them know that those colors would fade and spread out. Some kids colored with crayons too.


As the kids finished up I took them back to a table where I had watered down about 5 different colors of acrylic paint. I had them pick a color to represent the emotion they were showing in their picture.


Most kids chose 2-3 colors, but it was ok since they were really watered down. If they got too much water on the paper we used paper towels to dab up some. They liked the effects the wash had on the marker areas.


The end results were so awesome. My husband actually thought that the dog Jack did was the print we were discussing!! I let the pictures dry in the hallway for a few hours and then removed the tape (carefully). There were so many cool different pieces.


My kids pictures are hanging up in our house!